Beginners guide to data-import in Magento 2

Exporting and importing data plays a crucial role in the world of Magento2 eCommerce websites. Thankfully, the process of importing data isn’t as daunting as it may seem. However, there are some essential rules and guidelines that you should keep in mind.
In this article, we’re going to explain the process of importing product data through the CSV import feature in Magento 2. We’ll also provide you with a clear understanding of the rules and guidelines which are essential for a smooth data import experience.
Lastly, we will put this knowledge to use when we go through how to import price in Magento 2.
The CSV import function is a powerful tool that allows you to both create new products and update existing product data. This is specially efficient when managing large product catalogues. You can export the data, make necessary edits within the exported CSV file, and import it back into your webshop.
Additionally, you have the flexibility to import advanced pricing data, customer data, customer address data, and stock source details.
Preparation
Now, before we dive into the technical aspects, I would like to cover a few key points you should be aware of before diving into Magento 2’s Import-Export function.
CSV File Format
Magento 2 primarily uses Comma-Separated Values (CSV) files for data imports and exports. By default, CSV files use commas as separators to distinguish between values. However, Magento 2 offers the flexibility to specify alternative separators uses semicolons (;), pipes (|), or another delimiter depending on your specific requirements.
But before you experiment with other delimiters when importing and exporting data sheets, it’s essential to have a basic understanding of how CSV files work.
Column headers and data Validation
To explain column headers and data validation with an analogy:
Imagine you have different fruit boxes on your shelf. Each box is labelled with a sticker so the orange box is labelled oranges, the cherry box is labelled cherries and so forth. Column Headers are like the labels on the boxes. It explains what is contained in the column.
One day a person wants to make sure that each fruit box is labelled correctly. This is the validation process.
What you want in Magento 2 is that your column headers in your CSV files are correctly labelled and verified so your products and prices will be displayed correctly in your backend.
In essence, getting your column headers right in Magento 2 is much like ensuring your fruit boxes are correctly labelled on a shelf. Each box needs a clear sticker that matches the fruit inside – oranges, cherries, and so on. Your column headers are those labels, making sure everything is well-organised.
Now, picture another person who’s really good at checking labels. Before you put your fruits in their respective boxes, this person carefully examines each label to make sure it matches the fruit inside. This is just like the validation process we talked about earlier
In Magento 2, you want your CSV files to be like those accurately labelled fruit boxes. You want them to be meticulously checked and verified, so when you import your products and prices, everything shows up correctly in your online store. It’s all about ensuring that your data is not only accurate but also trustworthy for your customers.
Great. That was a lot to keep in mind before actually getting started. Now we are more prepared to learn more about Magento’s Import-Export function. In this blog I will give you a simple introduction on how to import price, including special price and cost price.
Having trouble? In this extended guide we will learn you how to handle character encoding issues in CSV files.
Without further ado, let’s check it out.
Settings overview
In Magento 2 you can update all fields except SKU (Stock Keeping Unit) through import. All these fields are what I’m going to explain individually.
Entity types
- Products: You can import or update all the data of your products.
- Advance Pricing: You can import tier pricing, and group pricing in products.
- Customers Main File: You can import essential customer details and customers personal data.
- Customer Addresses: You can import additional address information associated with customer accounts. Customers can have multiple addresses, such as billing addresses, shipping addresses, or multiple addresses for different store views.
- Customers and Addresses: You can import the combined data of both customer main data and their associated addresses in a single import process.
- Stock sources: The stock source import allows you to add new stock sources, quantity, stock status or update existing ones in bulk
Import Behaviour
- Add/update: This adds new data and updates existing data. If the imported data matches the existing data (based on a unique identifier like SKU), it will be updated. If the data is new or does not match existing data, it will be added as a new entry.
- Replace: This behaviour replaces existing data with the new imported data.
- Delete: This deletes all the data of that specific mentioned SKU’s products.
The import file needs to contain data with identifiers (e.g., SKU) of the entities you want to delete.
Make sure to have a backup of your data before using the “Replace” or “Delete” behaviour to avoid accidental data loss. Always test your imports with a small dataset first.
Validation Strategy
- Stop on Error: It will not allow you to run the import if any error occurred in your file.
This means that if any of the data in the import file have errors, the entire import process will be aborted. To avoid this, you can review the error logs and make corrections to the import file or the data to fix any issues and then attempt the import again - Skip Error Entries: This function allows you to specify the variety of errors you can run the import with. When “Skip Error Entries” is enabled, If an error is found in a particular data the import process still continues with errors and trying to import the rest of the data.
Allowed Error Counts
- Here you can type in the number of errors your import can have before pausing the import process. (Magento’s default is 10 errors)
- The import process stops and generates errors if a specific number of errors are detected.
It’s used with the stop on error strategy
Field Separator and Multiple Variable Separator
- By default, Magento uses comma (,) to separate values in CSV files, yet you can use other separators like semicolon (;) and pipe separation (|) to create or edit import files
Ensure that the data in the CSV file precisely matches the specified character to prevent any scrambled or garbled values.
We have come to the point where all our knowledge about CSV files and the import function in Magento 2 will be put into action.
Single Store View
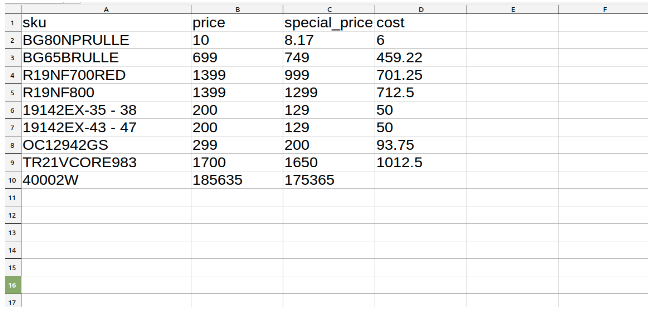
Let’s take a look at how to prepare the CSV file for price import for a single store view:
These columns must be filled out with information in the CSV file
- sku
- price
- special_price
- cost
Something important to address:
- SKU must not contain any marginal white space fx “ ABC123”, “ABC123 “,
and “ABC123” - Make sure all the products exist in the shop – you can add something that isn’t there
- All the price separators should be in the correct format. In Magento 2 the correct price separator is a period (.) NOT a comma (,), fx “$10.00” and NOT “$10,00”
Here is the example of a CSV file for a single storeviews which is used when importing price, special price and cost price.
Multiple Store Views
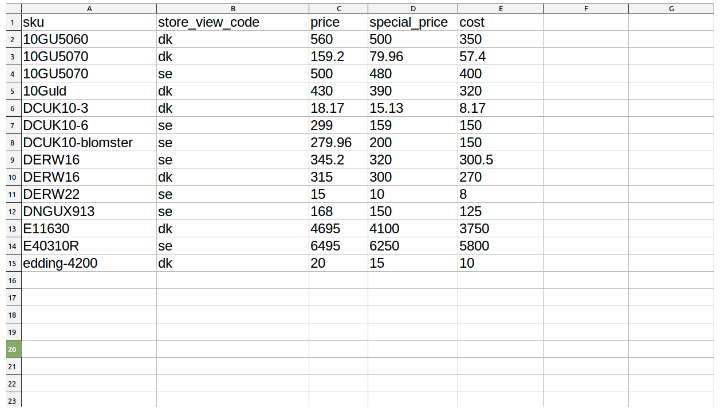
Let’s have a look at how to prepare the CSV file when importing price for multiple store views:
Required Columns in CSV file
- sku
- store_view_code
- price
- special price
- cost
Something important to address:
- If you want to import prices in Multiple store views then you have to specify the storeview code in the store_view_code column in the csv file.
- If you don’t add any value in store_view_code columns then it’ll update prices in the default storeviews
Here is the example file for Multiple stores views to import price, special price and cost price for multiple store views.
That’s all the steps you need to know when preparing the CSV file to be imported into Magento 2. Now, let’s look at the steps which comes right after; how do you import the CSV file
Importing
- Go to “System” -> Press “Import”
- Change Entity type to Products
- Change Import Behaviour to Add/Update
- In Select File to import choose your CSV file
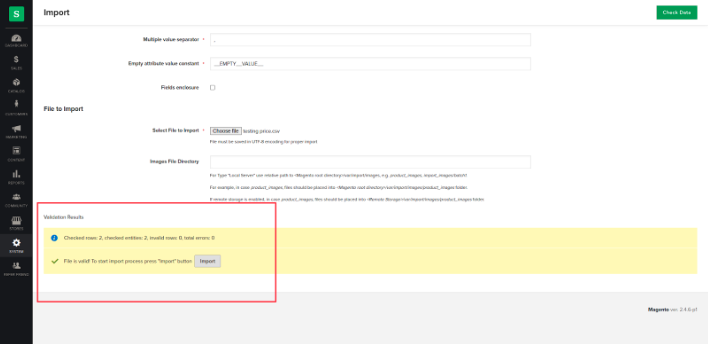
- Check data -> Click on the button to check if your CSV file contains errors such as garbled values, encoding issues and such.
Your screen should look something like this:

When you import your CSV files in Magento 2, you can run into different errors. These errors are often easily fixable, but the error messages are not always very clear.
Having trouble? In this extended guide we will learn you how how to spot error messages and how to fix them.
Once you’ve addressed all the potential errors you might come across, you’ll receive validation indicating that your file is now ready for import into Magento 2.
Click on import button to import CSV file as shown in the picture below:
A great tip is to always perform a thorough testing in a staging or local environment before performing any imports to your live store.
It’s also important to ensure that your import process behaves as expected and that your prices are accurate.
Thank you for reading this blogpost about how the CSV Import-Export function works in Magento 2. I hope you can use this knowledge yourself to become an even more proficient Magento-user.
Having trouble? In this extended guide we will learn you how how to spot error messages and how to fix them.